
Robots can be any shape, size or colour, which makes them perfect for a creative children’s craft activity.
With some coloured paper, cardboard and basic shapes, children can build their own robot and decide exactly what it looks like.
There is no correct design — a robot can have three eyes, four arms, wheels instead of feet or buttons covering its whole body.
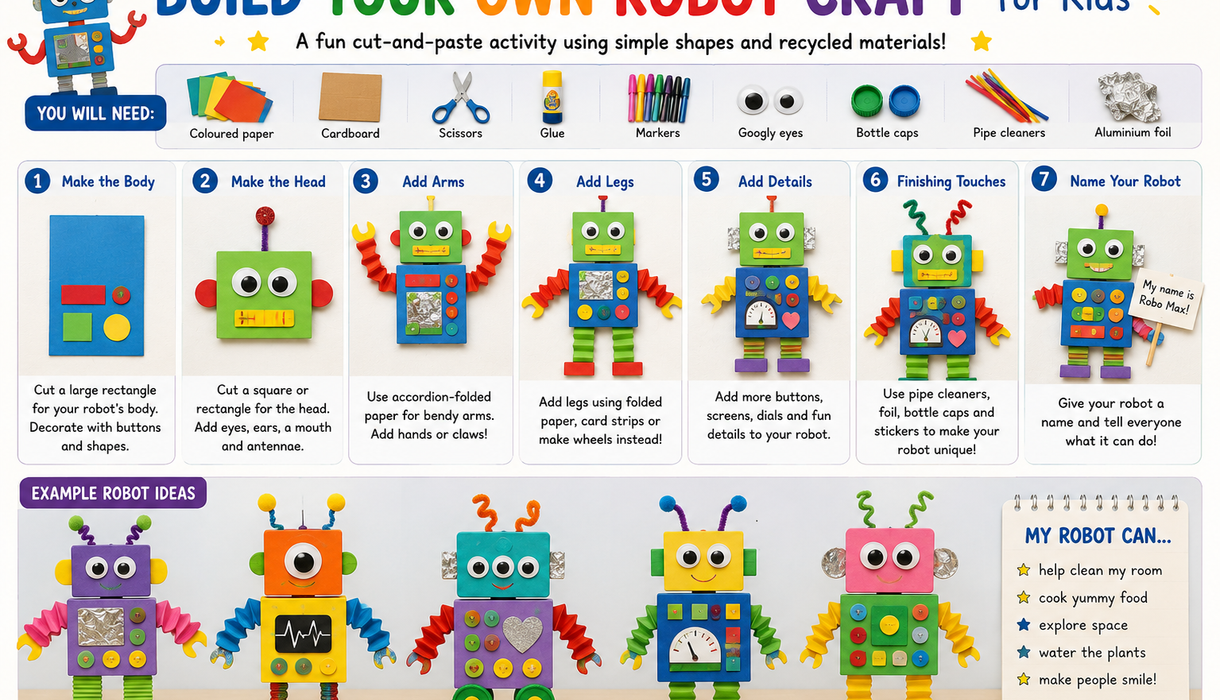
What You’ll Need
You can use:
- Coloured paper or cardstock
- Cardboard
- Child-safe scissors
- Glue
- Crayons or markers
- Googly eyes if available
- Aluminium foil
- Bottle caps
- Pipe cleaners
- Stickers
You don’t need all of these materials. Use whatever you already have available.
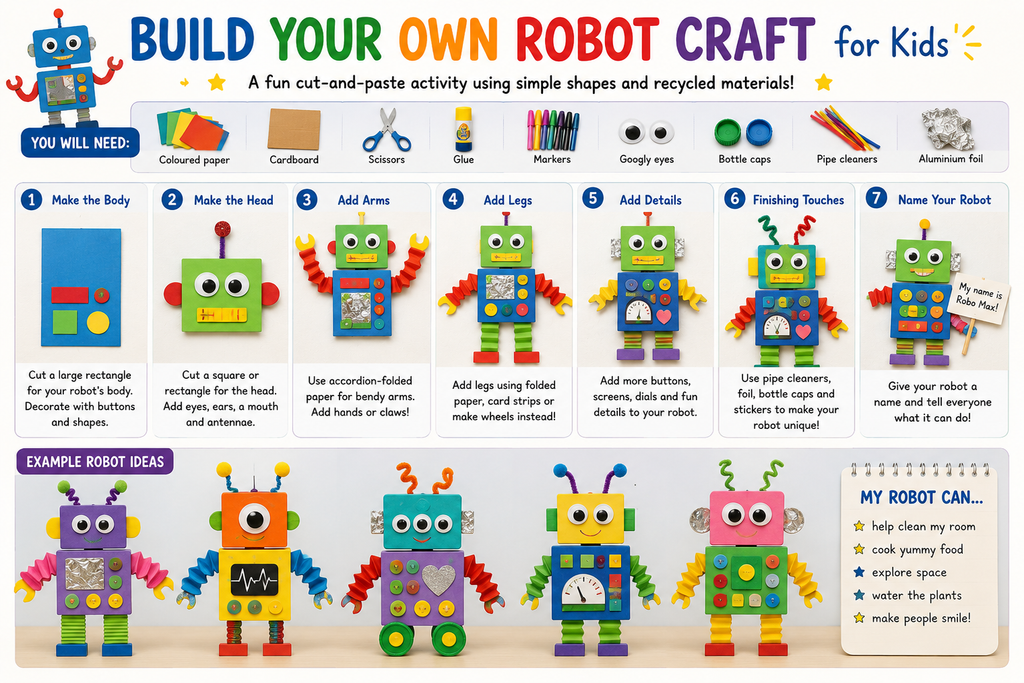
Start With the Robot’s Body
Cut a large rectangle or square from coloured paper or cardboard.
This will become the robot’s body.
Ask the child:
What colour should your robot be?
Will it be tall or short?
What jobs can your robot do?
These questions encourage children to think creatively before they begin decorating.
Make the Robot’s Head
Cut a square or rectangle for the head.
Add eyes using circles of paper, bottle caps or googly eyes.
The robot could have:
- One eye
- Two eyes
- Three eyes
- Lots of tiny eyes
Add a mouth using paper strips or markers.
Children might choose to make their robot happy, surprised, sleepy or silly.
Add Buttons and Controls
Cut small circles, squares and rectangles from different coloured paper.
Glue them onto the robot’s body to create:
- Buttons
- Screens
- Lights
- Switches
- Control panels
You can also use small pieces of aluminium foil to give the robot a shiny metallic look.
Create Robot Arms
Cut long rectangles or strips of paper.
Fold them forwards and backwards like an accordion.
Glue one end to the robot’s body.
This creates fun bendy robot arms.
Children can add paper hands, claws or tools at the ends.
Make the Legs
Robot legs can be made from:
Paper strips
Cardboard rectangles
Accordion-folded paper
Pipe cleaners
Add squares or rectangles at the bottom for feet.
Or make a robot with wheels instead of legs.
Add Antennae
Attach paper strips or pipe cleaners to the top of the robot’s head.
Add small circles or stars to the ends.
You can ask:
What does your robot’s antenna do?
Maybe it receives messages, finds treasure or communicates with other robots.
Give Your Robot a Name
Once the robot is finished, encourage the child to name it.
Some examples might be:
Robo Max
Beep-Boop
Spark
Bolt
Zoom Bot
Older children could also create their own robot information card:
Robot Name: ________
My robot can: ________
My robot helps with: ________
My robot’s special power is: ________
Try a Recycled Robot
You can make the activity even more creative by using recycled materials.
Try:
- Cereal boxes
- Small cardboard boxes
- Bottle caps
- Paper rolls
- Clean yoghurt containers
- Foil
- Scrap paper
Children can combine different objects to create a three-dimensional robot.
Talk About Shapes
Robot crafts are also a simple way to practise early maths.
Ask:
What shape is the robot’s head?
How many circles did you use?
Can you find three rectangles?
Which shape did you use for the buttons?
Children can learn about shapes while creating rather than completing a separate worksheet.
What Skills Can Children Practise?
This robot craft can support:
- Creativity
- Fine motor skills
- Cutting and gluing
- Shape recognition
- Hand-eye coordination
- Problem-solving
- Planning
- Imaginative thinking
- Vocabulary
- Independent decision-making
Create a Robot Family
If children enjoy the first robot, challenge them to create another.
They could make:
A tiny robot
A giant robot
A cooking robot
A cleaning robot
A space robot
A pet robot
Then arrange all the creations together to make a Robot Family or Robot City.
Keep Creating With PlayPrintGrow
Robot crafts give children the freedom to experiment with shapes, colours and unusual ideas.
Give them a collection of materials and ask:
“What kind of robot can you invent?”
Then let their imagination take over.
Build. Create. Imagine. Grow.